Create Daily Construction Report Entries
Objective
To create Daily Construction Report entries in the project's Daily Log tool.
Background
The Daily Construction Report section allows you to track the total number of workers and hours worked for each vendor or company and trade on a project. Additional categories for workforce labor can be configured in the Company Admin tool to use on projects. See How do I enable additional workforce labor types for the Daily Log?
Things to Consider
Required User Permissions:
To create entries:* 'Standard' or 'Admin' level permissions on the project's Daily Log tool.
ORTo create pending entries as a collaborator:* 'Read Only' or 'Standard' permissions to the Daily Log tool with the 'Collaborator Entry Only' granular permission enabled on your permission template. See Create Daily Log Entries as a Collaborator.
Additional Information:
Entries made by collaborators are marked as 'pending' until approved by an administrator.
There are additional workforce labor categories that can be added to the Daily Construction Report in the Daily Log: (e.g. Women, Veteran, Minority, First-Year Apprentice, Local (City), and Local (County)). In order to track hours for these additional workforce labor types, these fields must first be configured in the Daily Log section of the Company Admin tool, and then applied to one or more projects. See How do I enable additional workforce labor types for the Daily Log?
Note: After configured and applied, a 'Workforce Hours' column will be available with a link to 'Add Hours' link will appear in the Daily Construction Report section.
Steps
Navigate to the project's Daily Log tool.
Scroll to the Daily Construction Report section.
Fill out the following fields as appropriate:
Tip! Certain fields in the Daily Construction Report log can be configured as required, optional, or hidden in the Company level Admin tool. See Create New Configurable Fieldsets.#: This uneditable field counts the number of entries in a section (e.g. the first entry created will be # 1, and the second entry will be # 2).
Company: Select the company name from the drop-down menu. Companies must be added to the Directory tool to be selected in this drop-down menu. See Add a Company to the Project Directory.
Trade: Select the trade associated with the entry from the drop-down menu. You can only select from the trades already added to the project. See Add a Custom Trade.
Foreman: Enter the total number of foremen on-site that day followed by the total number of hours worked.
Journeyman: Enter the total number of journeymen on-site that day followed by the total number of hours worked.
Apprentice: Enter the total number of apprentices on-site that day followed by the total number of hours worked.
Others: Enter the number of any other workers and the total number of hours worked.
Comments: Enter any comments that may help clarify the entry.
Attachments: Attach any additional files to the entry. Click Attach File(s) and then drag-and-drop a file from your computer to the Drag and Drop your File(s) area, or click Upload Files to select a file from your computer. Once you save your item, users will be able to view the attachment in Procore's viewer or download the attachment.
Optional: If additional 'Workforce Hours' fields have been configured in the Company level Admin tool, you will see an 'Add Hours' link. See How do I enable additional workforce labor types for the Daily Log?

Click the Add Hours link.
Enter the hours for each category you want to track hours for.
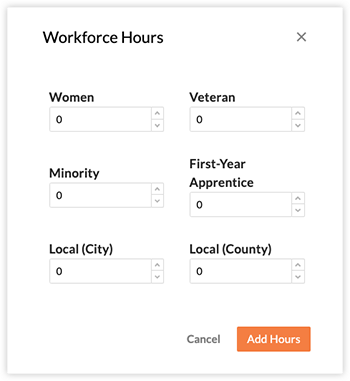
Click Add Hours to confirm.
Click Create.