Create an Email
Objective
To create and send an email from a project's Emails tool.
Background
The Emails tool in Procore lets you perform basic email functions, such as creating, sending, replying to, and forwarding messages. All incoming and outgoing messages are stored in the Emails tool so that you can keep your project communications secure in one place. You can also use the project's unique 'inbound email address', which can be added to the 'To' or 'CC' fields in any email program, to communicate about the project with Procore and non-Procore users. See Send An Inbound Email to the Project's Emails Tool.
Things to Consider
Required User Permissions:
'Standard' or 'Admin' permissions on the project's Emails tool.
Note: Only users that exist in the project's Directory tool are shown in the 'To' and 'CC' drop-down menus. See Add a Person to the Project Directory and Add a Distribution Group to the Project Directory.
Additional Information:
If you want to personalize the signature that appears in the outbound emails that you send from the project's Emails tool, see Set Up Your Outbound Email Signature.
If your recipients report that they did not receive an email that you sent from Procore, we recommend reviewing the following FAQs:* Why can't I receive an email from Procore?* How do I ensure that Procore emails reach the recipients?
If a user with 'Admin' permission on the project's Emails tool has created a 'Default Distribution' list (see Configure Advanced Settings: Emails), members of the default distribution list will receive ALL emails that have either been created in or sent from the Emails tool. Members will also receive all messages sent to the Emails tool via the inbound email address. This includes emails that have been marked 'Private'.
Steps
Navigate to the project's Emails tool.
Click Create Email.
Complete the data entry as follows:
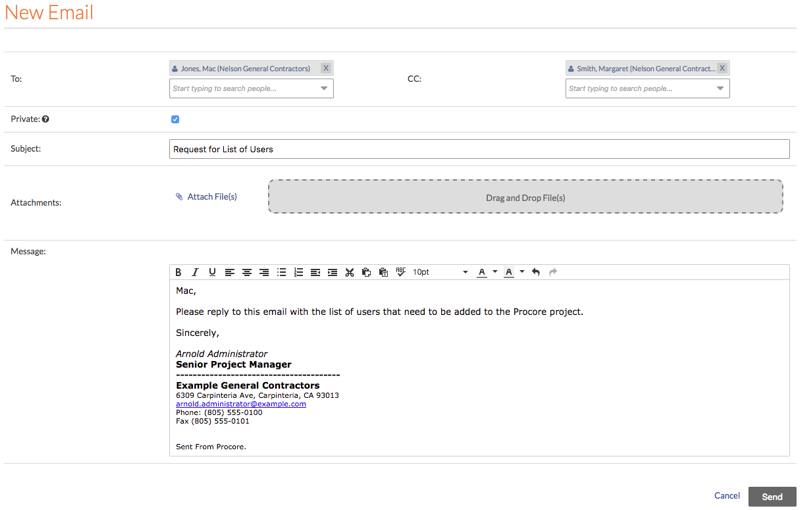
To. Start typing a name to search the Project Directory for a list of matching recipients. See Add a Person to the Project Directory. Then select the user or distribution group.
CC. Start typing a name to search the Project Directory for a list of matching carbon copy recipients. See Add a User Account to the Project Directory. Then select the user or distribution group.
- Important!*
Private. Mark this checkbox to set the new email to 'Private'. A private message can only be viewed by the user who created the message, users with 'Admin' level permission to the Emails tool, and Company Administrators.
If a user with 'Admin' permission on the project's Emails tool has created a 'Default Distribution' list (see Configure Advanced Settings: Emails), members of the default distribution list will receive ALL emails that have either been created in or sent from the Emails tool. Members will also receive all messages sent to the Emails tool via the inbound email address. This includes emails that have been marked 'Private'.
Subject. Enter a subject line for your email message.
Attachments. Click Attach File(s) or use a drag-and-drop operation to move files from your computer to the Drag-and-Drop File(s) area.
Message. Type the body of your email message.
Click Send.
This adds the email to the Procore application's outgoing email queue. Your sent email and any of its responses will be shown in the 'Inbox' tab of the Emails tool.