(Beta) Create a Custom Workflow Template for Budget Changes
Objective
To add a custom workflow to the Company level Workflows tool.
Background
In Procore, a workflow is a process that defines an approval path. A custom workflow is a process that defines a unique approval path that is specific to your organization and project(s). This tutorial summarizes the steps needed to create a custom workflow for use with Budget Changes.
Things to Consider
Required User Permissions:
To view, create, or edit a custom workflow at the company level:* 'Admin' level permissions on the Company level Workflows tool.
OR* 'Read Only' or 'Standard' level permissions on the Company level Workflows tool with the 'View Custom Workflows' and 'Create and Edit Workflow Templates' granular permission enabled on your permissions template.
Steps
Add a Custom Workflow
Navigate to the Company level Workflows tool.
Click the Create button.
In the 'Add a Workflow' dialog box, enter the following:
Name *. Enter a name for your new workflow.
Tool *. Select Budget Change.
Click Create.
Procore automatically opens the workflow builder and creates an 'Untitled' step for you. Tip
TipHow does the workflow builder automatically assign version numbers? To learn more see How are version numbers are updated in the Company level Workflows tool?
Update the Initial Standard Step in the Custom Workflow
The initial step in a custom workflow is always a standard step. For subsequent steps, you can choose between step types. To learn more, see What are the different types of steps in a custom workflow?
In the workflow builder, name your initial workflow step as follows:
Click the pencil icon and then type over the 'Untitled' step title in the right pane. Then press the RETURN key.
ORClick into the text box and type over the 'Untitled' step in the right pane. Then press the RETURN key.
In the workflow step, update the 'Details' section as follows:
 Example
For this example, we named the initial workflow step 'Start'. Next, you will complete the data entry in the 'Details' section pictured below.
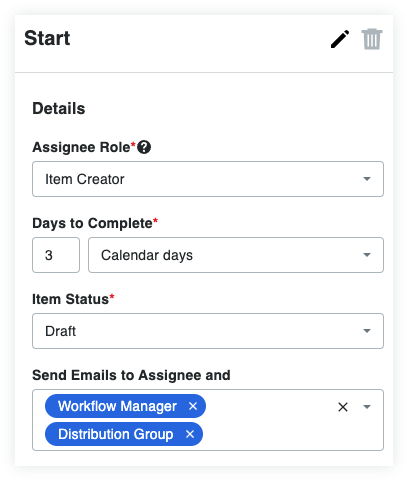 Note
NoteAn asterisk (*) below indicates a required field.
Assignee Role*. Select a role or group from the drop-down list. By default, 'Item Creator' is the only available option. An 'Item Creator' is the person who will be creating the invoice or contract the workflow will be used on.
TipDon't see the role that you want? You can create a new role in the Assignee Role drop-down list. Click the Add Assigned at Project Role button at the bottom of the list and enter a name for the group in the New Assigned at Project Role box. When you are ready to create your new role, click Create Role. Later, when configuring the custom workflow in the project(s) to which it is assigned, you can assign members to the group.
Days to Complete*. Enter a number in the first box. Then select Calendar Days of Business Days from the drop-down list. Procore's default option is Calendar Days. This defines the number of days the 'Assignee Role' has to complete the workflow step. Once the number of days passes, Procore sends an automated reminder once per day until the step is completed.
Item Status*. Select the status that the item must be in from the drop-down list. This defines the status the item must be in before the step can be performed in the custom workflow.
Optional: Send Emails to the Assignee and _____. Select the groups or roles that should receive an automated notification when the workflow step is NOT completed within the number of days specified above. The default groups include:
Workflow Manager. A workflow manager is a Procore user who must be designated on a project.
Item Creator. An item creator is a Procore user who created the item on which a workflow is applied.
Distribution Group. This is a default group for this custom workflow in the Workflows tool. After you publish this workflow and assign it to a project, you can define different group members when configuring the custom workflow on the Project level.
Choose from the following options to add the next step(s) to your custom workflow:
Add a Conditional Step to a Custom Workflow
Add a Standard Step to a Custom Workflow
Add a Finish Step to a Custom Workflow
Add a Termination Step to a Custom Workflow
Add a Conditional Step to a Custom Workflow
Your organization's approval policy may require your workflow to be routed differently depending on certain conditions.
Highlight an existing step in the custom workflow or click the
 icon on a step in the workflow builder and choose 'Conditional'.
In the 'Responses' section, click Add to add a response.
In the 'Responses' section in the right pane, do the following:
If Response Is. Select the desired response from the drop-down list. These options correspond to the actions performed by the 'Assignee Role' assigned to the workflow step.* Return.* Reject.* Approve.
Go to Step. Select the type of step that you want to create.
Click Add Step. Note: If you have already created the conditional step you want to use, you can select it from the 'Go to Step' drop-down list instead of clicking Add Step.
Choose Conditional from the list of step types and name the step.
Click Create new step.
After creating the conditional step, click on it in the workflow builder to begin defining the conditions:
When. Select the first part of the hypothesis in the conditional statement (Currency amount).
Is. Select the hypothesis for the conditional step.* Greater than. If your organization requires additional signatures for amounts that are greater than or equal to a specified amount, you will want to choose this option and enter an amount in the field to the right.
OR* Less than. If you want the step to function when the 'Original Contract Amount' is less than a specified number.Then. Select a step from the drop-down list or create a new one by clicking the Add Step button.
Otherwise. Select a step from the drop-down list or create a new one by clicking the Add Step button. This is the step that will be next if the 'Original Contract Amount' does not meet the conditions you have set.
Add a Standard Step to a Custom Workflow
Click the
 icon attached to an existing step in the workflow builder and choose Step. Tip
New steps can also be made when creating responses for existing steps. In the 'Go to Step' drop-down list, choose Add Step.
Optional: Change the name of the workflow step as desired:
Click the pencil icon and then type over the existing step title in the right pane.
ORClick the text box on the right pane and type a title.
In the workflow step, update the 'Details' section as follows:
NoteAn asterisk (*) below indicates a required field.
Assignee Role*. Select a role or group from the drop-down list. By default, 'Item Creator' is the only available option. For commitments, an 'Item Creator' is the person who created a commitment on a project.
TipDon't see the role that you want? You can create a new role in the Assignee Role drop-down list. Click the Add Assigned at Project Role button at the bottom of the list and enter a name for the group in the New Assigned at Project Role box. When you are ready to create your new role, click Create Role. Later, when configuring the custom workflow in the project(s) to which it is assigned, you can assign members to the group.
Days to Complete*. Enter a number in the first box. Then select Calendar Days of Business Days from the drop-down list. Procore's default option is Calendar Days. This defines the number of days the 'Responsible Group' has to complete the workflow step. Once the number of days passes, Procore sends a reminder until the step is completed.
Item Status*. Select the status that the item must be in to trigger the step in the workflow.
Optional: Send Emails to the Assignee and _____. Select the groups or roles that should receive an automated notification when the workflow step is NOT completed within the number of days specified above. The recipients named here will also receive an email when the workflow step is completed.
Add a Finish Step to a Custom Workflow
A finish step defines the end of a workflow. For example, in your commitment workflow, you would add a finish step to indicate that a subcontract or purchase order has been approved and that all of the conditions have been satisfied. A finish step indicates the custom workflow is complete.
Click the
icon attached to an existing step in the workflow builder and choose Finish Step.Optional: Change the name of the workflow step as desired:* Click the pencil icon and then type over the existing step title in the right pane.
OR* Click the text box on the right pane and type a title.
In the right pane, update the 'Details' section as follows:
Item Status*.* Approved* Complete
Optional: Send Emails to the Assignee and _____. Select the groups or roles that should receive an automated notification when the workflow step is completed.
Choose from these options:
Save as Draft. Click this button to save a numbered 'Draft' version. Choose this option when you are still working on your custom workflow.
ORSave and Publish. Click this button to create a newly published version. Choose this option when you are ready to assign your workflow to a project.
Add a Termination Step to a Custom Workflow
Click the
icon attached to an existing step in the workflow builder and choose Finish Step.Optional: Change the name of the workflow step as desired:* Click the pencil icon and then type over the existing step title in the right pane.
OR* Click the text box on the right pane and type a title.
In the right pane, update the 'Details' section as follows:
Item Status*.* Terminated* Void
Optional: Send Emails to the Assignee and _____. Select the groups or roles that should receive an automated notification when the workflow step is completed.
Choose from these options:
Save as Draft. Click this button to save a numbered 'Draft' version. Choose this option when you are still working on your custom workflow.
ORSave and Publish. Click this button to create a newly published version. Choose this option when you are ready to assign your workflow to a project.