Best Practices
When Procore Pay customers enable the Company level Workflows tool, an authorized team member can create a custom workflow template to approve/reject your disbursements. Your company can create any number of Payments workflow templates. However, only one (1) of those template(s) can be assigned as the default template for Procore Pay.
1. Create and Configure Your Templates
Who will be your company's Workflow Manager and who must complete the workflow steps? | How do you manage end-user permissions for Procore Pay + Workflows? | How do you create a Payments Workflow Template? | How do you configure the Payments Workflow Template? |
A Payments Workflow always requires a Workflow Manager. Workflows also require assignees to submit responses to the steps. It helps to sketch out your desired workflow and participants before you get started. Ready to learn more? See Plan a Custom Workflow Template. You can also review our Example Payments Workflow. |
Each participant must be a Payments Admin or Payments Disburser. Next, Create a Company Permissions Template for Payments and Assign the Company Permissions Template to each participant. Ready to learn more? Learn about the available granular permissions by reading What granular permissions are available for Payments Workflows? |
Use the Company level Workflows tool to Create a Custom Workflow Template for Payments. You can create multiple templates, but can only assign one (1) to be the default workflow for Procore Pay. Ready to learn more? Review the Example Payments Workflow for recommended steps. You can also Review the Self-Serve Workflow User Guide. |
Next, Configure the Settings for a Payments Workflow Template. This is where you add your company's Workflow Manager and assignees to the steps in the Payments Workflow. Ready to learn more? You can only assign one (1) default template for Procore Pay. See Assign a Default Workflow Template for Procore Pay. |
2. Start Using Your Default Payments Workflow
How do you start the Payments workflow? | Need to submit an approve/reject response to a workflow? | Need to start, restart, or return to a previous step in a workflow? |
A Payments Admin or a Payments Disburser follows the steps in Create Disbursements. After selecting the funding account, Procore Pay automatically starts the Payments workflow for the disbursement when the Workflow tool is enabled. |
If you are assigned to review a disbursement, submit a response before the due date. To learn more, see Approve or Reject a Disbursement. After submitting an 'Approve' response, an Action Required banner prompts the final reviewer to Authorize the disbursement. Funds are only withdrawn after authorization. See Create Disbursements. |
If you are the designated Workflow Manager for your company's Payments Workflow, learn how to Start a Custom Workflow, Restart a Custom Workflow, or Return a Workflow to a Previous Step. You can also Add Additional Assignees when the existing assignees are unavailable. |

 Important
Invoice approval and disbursement authorization must be completed by two (2) different Procore users.
If you are the Payments Admin or Payments Disburser who placed any of the invoices on the disbursement into the 'Approved' or 'Approved as Noted' status, Procore Pay will not permit you to approve the disbursement.
Example Payments Workflow
This is an example of a Payments workflow that starts automatically when a disbursement is created. You can use this example to create your company's Payments Workflow or you can create your own custom workflow to suit your specific business needs. For step-by-step instructions, see Create a Custom Workflow Template.
 Example
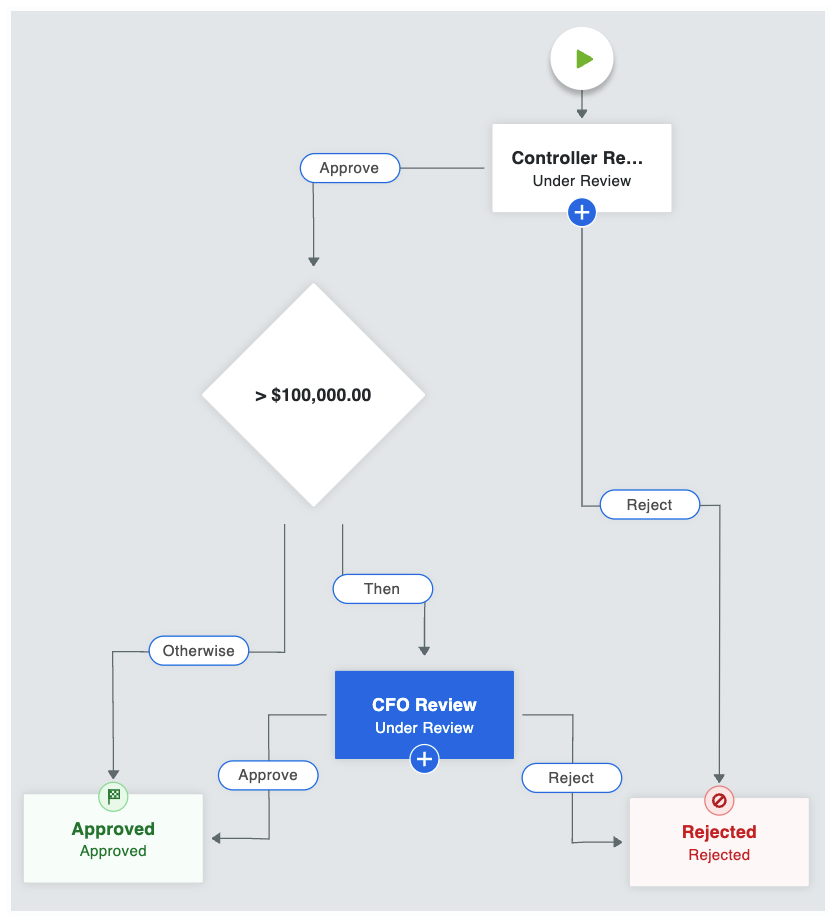
This table shows you the workflow steps and step details for the example workflow. You can customize the steps and details as needed. To learn more, see What are the different types of steps in a custom workflow?
Step Name | Step Details | What does it do? |
|---|---|---|
Controller Review |
| When a disbursement is created, the workflow is placed into the Under Review status and automatically assigned to the Controller. Emails are sent to the Controller, Workflow Manager & Item Creator. The Controller has five (5) days to provide an approve or reject response. |
> $100,000.00 |
| When a controller approves a disbursement and the aggregate disbursement amount is $100,000.00 or greater, the system requires secondary approval by the CFO. If the disbursement amount is less than $100,000, the system automatically moves the disbursement to the Approved step. To learn more about condition steps, see Optional Condition Steps for the Payments Tool. |
CFO Review |
| When the aggregate disbursement amount is greater than $100,00.00, the workflow remains in the Under Review status and is automatically assigned to the CFO. Emails are sent to the CFO, Workflow Manager, and Item Creator. The CFO has five (5) days to provide a response. |
Approved |
| When the Controller or CFO (only if secondary approval was a required condition), an 'Approve' response updates the disbursement's status to Approved. Emails are sent to the Assignees (Controller and CFO), Workflow Manager, and Item Creator. |
Rejected |
| When the Controller and/or CFO submit a Reject response, the system updates the disbursement's status to 'Rejected.' Emails are sent to the Assignees (Controller and CFO), Workflow Manager, and Item Creator. |
Optional Condition Steps for the Payments Tool
When creating conditional statements for the Payments tool, Workflow Managers have these options: