Manage Insurance Documents & Statuses
The steps to follow depend on the management method your team decides to use:
Manage Insurance Compliance Status with the Commitments Tool
ORManage Insurance Documents and Compliance Status with the Directory Tool
Manage Insurance Compliance Status with the Commitments Tool
If your company simply wants to track whether a commitment is compliant with insurance requirements or not, users with the appropriate permissions can input the commitment's status directly in the Commitments tool.
Navigate to the Project level Commitments tool.
Under the Contracts tab, locate the commitment to work with.
Click the Number link to open it.
Click the Compliance tab.
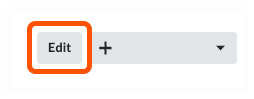
In the Insurance card, click the Edit button.
 Note
NoteWhen managing insurance compliance status with the Commitments tool, you do not use the Add Insurance button. The add button is only used when managing insurance documents and compliance status with the Directory tool. See Manage Insurance Documents and Compliance Status with the Directory Tool.
In the Compliance Status drop-down list, select one of the following statuses:
Compliant. If the commitment contract is in compliance with its insurance requirements, select this option.
Not Compliant. If the commitment contract is NOT in compliance with its insurance requirements, select this option.
Not Required. If tracking compliance status is not required for this commitment, select this option. Selecting this option has no effect on the commitment's overall insurance compliance status.
Enter any information about the insurance compliance status in the Description field.
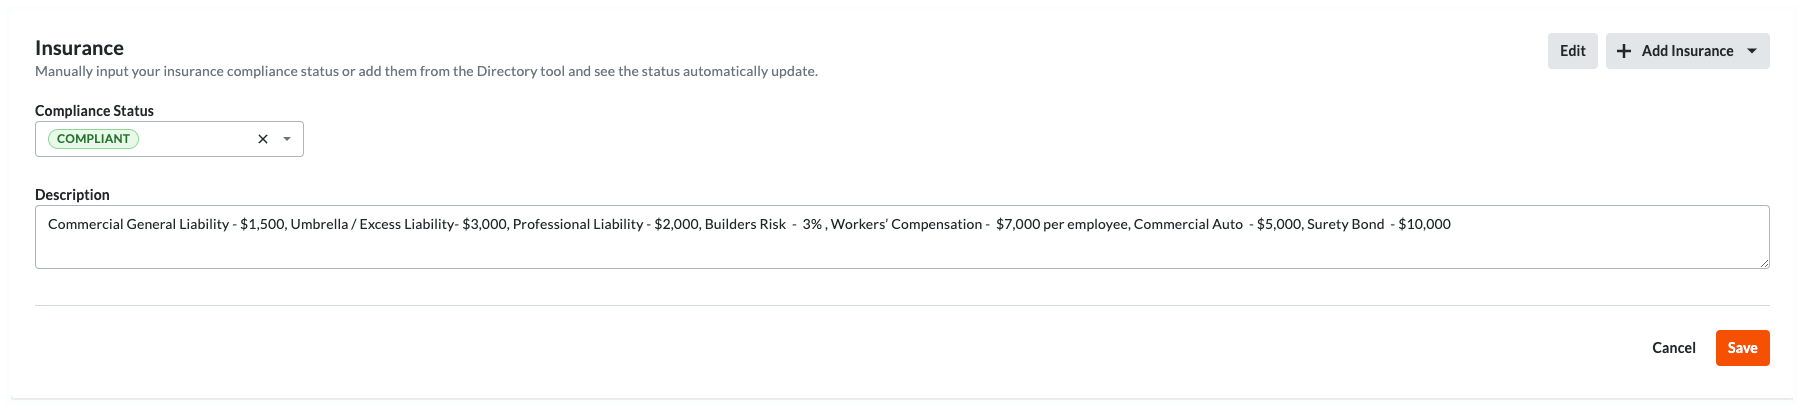
Click Save.
This saves the insurance compliance status and logs your entry in the commitment's Change History tab. You can change the status or description at any time using the Edit button. Tip
TipWant to switch from managing insurance compliance with the Commitments tool to managing insurance documents and compliance status with the Directory tools? If you initially manage insurance compliance status with the Commitments tool and later decide to manage insurance documents and compliance statuses with the Directory tools, any previous compliance status changes are saved in the commitment's Change History tab. See View the Change History of a Commitment. After you switch, insurance changes are logged in the Company or Project level Directory tool's Change History tab.
Manage Insurance Documents and Compliance Statuses with the Directory Tools
If your company adds insurance documents for your contractors, subcontractors, and vendors in the Company and/or Project Directory tools, Procore automatically manages the insurance compliance status of each document for you.
Video
Steps
Navigate to the Project level Commitments tool.
Under the Contracts tab, locate the commitment to work with.
Click the Number link to open it.
In the commitment, click the Compliance tab.
Scroll to the Insurance card.
Choose from these options:
NoteWhen managing insurance information with the Directory tools, actions are always logged in the Change History tab of the corresponding Directory tool instead of the commitment's Change History tab.
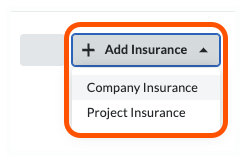
Add Insurance
View Insurance
Edit Insurance
Remove Insurance
Add Insurance
To add new insurance information, choose the appropriate option:
NoteThe Add Insurance and Edit menu buttons are only visible and available to an invoice administrator who is also a designated Insurance Manager (see Designate an Insurance Manager for Your Procore Company) or who has 'Admin' level permissions on the Company level Directory tool.
The Add Insurance and Edit menu buttons are only visible and available to an invoice administrator who is also a designated Insurance Manager (see Designate an Insurance Manager for Your Procore Company) or who has 'Admin' level permissions on the Company level Directory tool.
When adding the first insurance document... | For subsequent insurance documents... |
|---|---|
|
|
After you choose a menu option, Procore launches the Company or Project level Directory tool and opens the company profile of the 'Contract Company' to the Insurance tab. You can then follow the steps in:
View Insurance
If the 'Contract Company' on the commitment has any existing insurance information stored in the company profile of the Directory tools, that insurance information appears as rows in the table in the commitment's Insurance card.

Insurance Card
This table details the elements of the Insurance card in a commitment.
Element | Type | Description |
|---|---|---|
Add Insurance or Edit | Menu Buttons | Users with the appropriate permissions can either click the Add Insurance button (if this is the first insurance entry) or the Edit button (if this is a subsequent insurance entry) and choose one (1) menu option:
|
Compliance Status | Status | Procore looks at the insurance information stored in the Directory tools to determine the commitment's status:
|
Name | Field | Shows the name from the Company or Project Directory. Typically, users enter the name of the insurance certificate, policy, or document in this field. |
Level | Field | Shows whether the insurance information was added to the Company or Project Directory. |
Effective Date | Field | Shows the effective date for the insurance information in the Company or Project Directory. |
Expiration Date | Field | Shows the expiration date from the Company or Project Directory. These icons also alert users when the insurance is nearing or past the expiration date:
Expiring Soon. Starts showing 14 days before the expiration date set for the insurance.
Expired. Starts showing one (1) day after the expiration date set for the insurance. Note: Expiration notifications are managed in the Procore web application's Directory tool. To learn how to configure notifications, see Add Project Insurance to a Company Record in the Project Directory and Add Insurance to a Company Record in the Company Directory. |
Notes | Menu | Shows any notes for the insurance information in the Company or Project Directory. |
| Attachment | Coming Soon Click this link to open a copy of the insurance information's file attachment. |
 Important


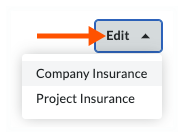
Edit Insurance
To edit existing insurance documents, click the Edit button and choose the Company Insurance or Project Insurance menu option. This launches the corresponding Directory tool and opens the company profile to the Insurance tab.
Next, click the Edit button in the Insurance tab of the company profile in the corresponding Directory tool. To learn about your editing options, see:
NoteWhen managing insurance with the Directory tools, changes to the insurance insurance are logged in the Change History tab of the corresponding Directory tool. Changes are not logged in the commitment's Change History tab.
When managing insurance with the Directory tools, changes to the insurance insurance are logged in the Change History tab of the corresponding Directory tool. Changes are not logged in the commitment's Change History tab.
Remove Insurance
Insurance documents must be removed from the Directory tools. To remove insurance, click the Edit button and choose the Company Insurance or Project Insurance menu option. This launches the corresponding Directory tool and opens the company profile to the Insurance tab.
You can then follow the steps in: